| Oracle® Multimedia DICOM Developer's Guide 11g Release 2 (11.2) Part Number E10778-01 |
|
|
View PDF |
| Oracle® Multimedia DICOM Developer's Guide 11g Release 2 (11.2) Part Number E10778-01 |
|
|
View PDF |
This chapter describes the Oracle Multimedia DICOM Image Archive Demonstration, a DICOM sample application for Oracle Application Express, which you can use to build your own custom DICOM applications.
This chapter includes these sections:
See Appendix E for the location of this sample application.
Note:
This DICOM sample application is undergoing continuous improvements. Thus, the information in this chapter might not match the sample application shipped on OTN.See the online readme.txt file that is included in the ZIP file with the Oracle Multimedia DICOM Image Archive Demonstration for information about the latest version of this sample application, and for complete requirements and instructions for installing and using it.
The DICOM sample application demonstrates many of the features of Oracle Multimedia DICOM. These features are as follows:
Storing and retrieving medical imaging data in the database to synchronize the DICOM data with the associated business data
Full object interfaces to Oracle Multimedia DICOM features
Extracting DICOM metadata according to user-specifiable XML schemas
Querying using extracted metadata, including querying using text that has a semantic relationship with text in the extracted metadata
Image processing, such as generating thumbnail images
Creating new DICOM objects
Validating conformance based on a set of user-specified conformance rules
Making DICOM objects anonymous based on user-defined rules that specify the set of attributes to be made anonymous and how to make those attributes anonymous
The ability to update run-time behaviors, such as constraint rules and anonymity behavior, without installing a new release of Oracle Database
The DICOM sample application is demonstrated in a browser. Because a DICOM viewer is not available, full-size JPEG images and JPEG thumbnail images are created using Oracle Multimedia DICOM features. These images are stored in a main archive table, along with the original DICOM images. Additionally, all the metadata from the DICOM images is extracted from the DICOM images to enable searching based on DICOM metadata.
Creating the Main Archive Table
Upon installation of the sample application, the main archive table dicom_archive is created with the following columns:
id - an integer used as the primary key
parent_id - an integer that identifies the original image from which the DICOM image is created (used when new DICOM content is created; for example: when making an anonymous copy of a DICOM image)
dcm_filename - the file name of the DICOM image that was imported
description - a text description of the DICOM image
dicom - the DICOM image stored as an ORDDicom object type
image - the DICOM image in JPEG format
thumb - a JPEG thumbnail image of the original DICOM image
metadata - the user-defined metadata stored as a data type XMLType
isanonymous - a flag that indicates whether the DICOM image and its associated metadata were made anonymous; if so, researchers have the ability to access the DICOM image and its metadata
The code segment shown in Example 8-1 creates the table dicom_archive.
Example 8-1 Script to Create the Main Archive Table
--
-- the main archive table
--
create table dicom_archive
(
 id             integer not null primary key,
 parent_id      integer,        -- where this image is created from
 dcm_filename   varchar2(60),   -- dicom image file name from import
 description    varchar2(100),  -- description of the image
 dicom          orddicom,       -- dicom data
 image          ordimage,       -- dicom data in jpeg format
 thumb          ordimage,       -- dicom data in jpeg thumbnail
 metadata       xmltype,        -- user customized metadata
 isanonymous    integer         -- accessible flag for the research role.
)
-- use pctfree parameter to avoid too many chained rows
pctfree 60
lob (dicom.source.localdata) store as securefile (nocache disable storage in row),
-- disable in row storage for the extension
-- so that it does not consume page space
-- it is usually < 4k in size
lob (dicom.extension) store as securefile (nocache disable storage in row),
-- store the metadata attribute of the orddicom object as clob,
-- which is full-text indexed. this is usually stored out of line
-- because it is size > 4k
xmltype dicom.metadata store as securefile clob (nocache),
lob (image.source.localdata) store as securefile (nocache disable storage in row),
lob (thumb.source.localdata) store as securefile (nocache),
-- bind the table with the schema so that the
-- the metadata column is shredded stored.
  xmltype column metadata
  xmlschema "http://xmlns.oracle.com/ord/meta/dia_demo"
  element dicom_image;
/
Note:
The preceding code segment uses SecureFile LOB storage for the media content. See Oracle Database SecureFiles and Large Objects Developer's Guide for more information about SecureFile LOBs. See Oracle Multimedia User's Guide for tuning tips with SecureFile LOBs.After the main archive table is created, DICOM data can be loaded. When data is loaded, all the metadata from the DICOM images is extracted to enable searching. In addition, JPEG full-size images and thumbnail images are generated for display in a Web browser.
The DICOM sample application includes these user interfaces:
DICOM Image Archive
DICOM Image Archive Administration
Each user interface in the sample application has a separate login page. When logging in to the DICOM Image Archive interface, clinicians and researchers must identify their roles. Administrators are automatically identified when they log in to the DICOM Image Archive Administration interface.
The DICOM Image Archive interface demonstrates the kinds of user tasks that clinicians and researchers can perform to complete one or more operations on the sample DICOM content.
Table 8-1 lists the all the tasks that are demonstrated in the DICOM Image Archive interface of the DICOM sample application, and indicates which type of user can perform each task.
Table 8-1 DICOM Image Archive Interface: Tasks and Designated Users
| Task | User |
|---|---|
|
Adding DICOM images to the archive (import) |
Clinician |
|
Downloading selected DICOM images (export) |
Clinician Researcher |
|
Converting and downloading DICOM images |
Clinician |
|
Processing DICOM images (processCopy) |
Clinician Researcher |
|
Converting and loading scanned non-DICOM images (createDicomImage) |
Clinician Researcher |
|
Compressing and deleting selected DICOM images |
Clinician |
|
Editing metadata of selected DICOM images |
Clinician |
|
Deleting selected DICOM images from the archive |
Clinician |
|
Making selected DICOM images anonymous |
Clinician |
|
Validating the conformance of selected DICOM images |
Clinician Researcher |
The DICOM Image Archive Administration interface shows the tasks that only administrators can perform to manage the sample DICOM data model repository and the configuration documents stored within it.
Table 8-2 lists the all the administrator tasks that are demonstrated in the DICOM Image Archive Administration interface of the DICOM sample application.
Table 8-2 DICOM Image Archive Administration Interface: Tasks
| Task |
|---|
|
Exporting documents from the DICOM repository (Download) |
|
Inserting documents into the DICOM repository (Add) |
|
Deleting documents from the DICOM repository (Delete) |
In addition, several search capabilities are available to help users find specific DICOM images that are stored in the archive. Table 8-3 summarizes the types of searches users can perform.
Table 8-3 DICOM Sample Application: Search Capabilities
| Type of Search | Description |
|---|---|
|
Searches on DICOM attributes |
Require an exact (ignoring case) match for the text you enter in one or more DICOM attribute fields. (See Section 8.2.2.1.) |
|
Searches on keywords |
Require an exact match (ignoring case) for the text you enter in the Keyword field. (See Section 8.2.2.2.) |
|
Searches on semantic data |
Require a semantically related match for the text you enter in the Semantic field. (See Section 8.2.2.3). See also Oracle Database Semantic Technologies Developer's Guide. |
The following subsections describe how to perform a few common tasks for each user interface in the DICOM sample application.
Before you can begin to work on any of the user tasks, you must log in to the DICOM Image Archive interface and identify your role as a clinician or researcher.
Logging In as a Clinician
Follow these steps to log in as a clinician:
In the Login As field, select Clinician.
Figure 8-1 shows the login page for a user with the role of clinician selected.
Figure 8-1 Login Page for Clinicians and Researchers

Enter your user name in the User Name field.
Enter your password in the Password field.
Click Login.
The DICOM Image Archive Home page appears. This Home page includes a search area, a Thumbnails area, a Tasks area, and an Image Summary area. The following four figures show each area on the Home page.
Figure 8-2 shows the text input fields in the search area. The search area also includes a Reset button and a Search button, to the right of the text input fields.
Figure 8-2 Search Area on the DICOM Image Archive Home Page

After logging in successfully (as a clinician or a researcher), the text input fields in the search area enable you to access various search capabilities and find specific DICOM images that are shipped with this sample application.
Figure 8-3 shows the Thumbnails area, which contains six thumbnail images representing the DICOM images that are installed with the sample application.
Figure 8-3 Thumbnails Area on the DICOM Image Archive Home Page
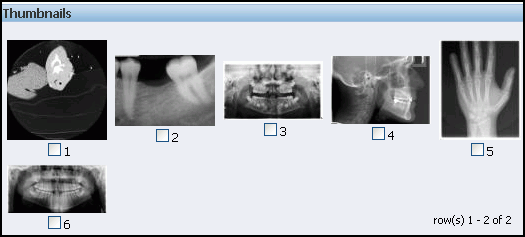
Figure 8-4 shows the Tasks area, with the default text in the selection field. The Tasks area also includes a Start button, to the right of the selection field.
Figure 8-4 Tasks Area on the DICOM Image Archive Home Page

To view all the designated user tasks for the clinician role, scroll through the items in the Tasks list on this Home page. (See Table 8-1 for the list of clinician tasks.)
You can rest the mouse on each thumbnail image to view the metadata summary for that installed DICOM image. Figure 8-5 shows the Image Summary area, with a list of fields containing the metadata summary for DICOM image 1 (Image Summary: 1).
Figure 8-5 Image Summary Area on the DICOM Image Archive Home Page
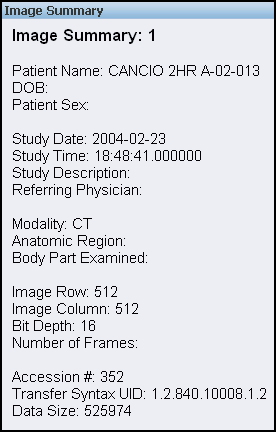
The metadata summary shows only a subset of the metadata for a selected image in the archive. Complete definitions of the metadata for each image are contained in the ORDDicom object in XML format. You can click each thumbnail image to view this XML metadata, and to view the full-size version of the DICOM image in JPEG format.
Logging In as a Researcher
Logging in as a researcher is similar to logging in as a clinician. Follow the same set of steps, with this exception: in Step 1, select Researcher in the Login As field.
To view all the designated user tasks for the researcher role, scroll through the items in the Tasks list on the DICOM Image Archive Home page for researchers. (See Table 8-1 for the list of researcher tasks.)
Note:
Researchers are permitted to access only images that have been made anonymous. The default images that are shipped with the DICOM sample application contain patient identifying information. Thus, the first time a researcher logs in to the DICOM sample application, no images are available. See Section 8.2.4 for more information.The DICOM sample application comes with a set of DICOM images. Clinicians and researchers can perform several kinds of searches for these images using text (such as patient name and anatomic region information), which is contained in the XML metadata. You can use attributes, keywords, or semantic data to search on the metadata and find these DICOM images (see Table 8-3).
The following text input fields are included in the search area on the DICOM Image Archive Home page, as shown in Figure 8-2:
Keyword
Semantic
Modality
Patient Name
DOB
Accession #
Ref. Physician
Study Date
The search area also includes a Search button, which you click to begin each search, and a Reset button, which you can click to restore the search area back to the full archive of images.
The search area is the same for clinicians and researchers. In this section, the search examples were performed as a clinician.
Attribute searches enable searching for DICOM images using XPath queries on the DICOM metadata, thus limiting the search to specific attributes in the DICOM metadata. These searches require a match between the text you enter in one or more DICOM attribute fields and the text contained in only those attributes in the DICOM metadata, regardless of case.
The DICOM sample application enables you to search for DICOM images using these DICOM attributes:
Modality
Patient Name
DOB
Accession #
Ref. Physician
Study Date
For example, to search for the DICOM image that contains the patient name CANCIO using an attribute search, enter CANCIO in the Patient Name field on the DICOM Image Archive Home page. Then, press Return or click Search.
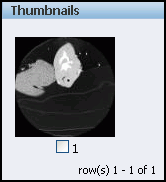
The attribute search returns the matching image (numbered 1) of the lungs for the patient named CANCIO, as shown in the Thumbnails area in Figure 8-6.
Figure 8-6 Thumbnail Image Result for an Attribute Search
Rest the mouse on thumbnail image 1 to view the Image Summary for DICOM image 1 for the patient named CANCIO (Image Summary 1: in Figure 8-5), as follows:
Patient Name: CANCIO 2HR A-02-013
DOB:
Patient Sex:
Study Date: 2004-02-23
Study Time: 18:48:41.000000
Study Description:
Referring Physician:
Modality: CT
Anatomic Region:
Body Part Examined:
Image Row: 512
Image Column: 512
Bit Depth: 16
Number of Frames:
Accession #: 352
Transfer Syntax UID: 1.2.840.10008.1.2
Data Size: 525974
Click thumbnail image 1 to view the full-size version, or to view the XML metadata for DICOM image 1.
The metadata for the patient's name is defined in the <PERSON_NAME> tag, as shown in this code segment from the XML metadata for DICOM image 1:
<PERSON_NAME tag="00100010" definer="DICOM" name="Patient's Name" offset="710" length="22">
<NAME type="unibyte">
<FAMILY>CANCIO 2HR A-02-013</FAMILY>
</NAME>
<VALUE>CANCIO 2HR A-02-013</VALUE>
</PERSON_NAME>
Keyword searches enable searching for DICOM images using keywords. These searches require a match between the text you enter in the Keyword field and the text contained in any attribute of the DICOM metadata, regardless of case.
For example, to search for dental images in the archive, enter the term jaw in the Keyword field on the DICOM Image Archive Home page. Then, press Return or click Search. This search finds images with the term jaw in any attribute of the DICOM metadata.
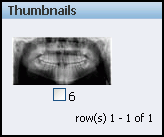
The keyword search on the term jaw returns one matching image (numbered 6), as shown in the Thumbnails area in Figure 8-7.
Figure 8-7 Thumbnail Image Result for a Keyword Search
To view the metadata summary for DICOM image 6, as shown in Figure 8-8, rest the mouse on thumbnail image 6.
Figure 8-8 Image Summary Result for a Keyword Search
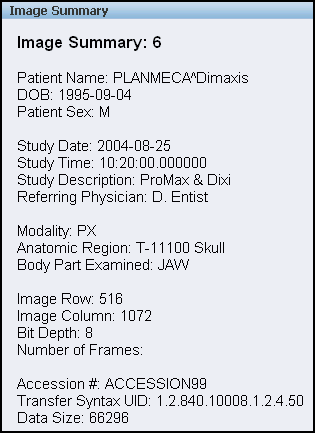
A single image is returned as a match because it is the only DICOM image in the archive that contains text with the term jaw in the DICOM metadata, as shown in the Body Part Examined: field in the Image Summary area in Figure 8-8.
Click thumbnail image 6 to view the full-size version, or to view the XML metadata for DICOM image 6.
Semantic searches enable searching for DICOM images based on semantic relationships, which are loaded into the database during the installation of the sample application. These searches require a semantically related match between the text you enter in the Semantic field and the text contained in any attribute of the DICOM metadata.
Note:
Oracle Spatial must be installed before you attempt to perform a semantic search. See Oracle Database Semantic Technologies Developer's Guide for more information about this feature.Using the example from the keyword search for dental images, enter the term jaw in the Semantic field on the DICOM Image Archive Home page. Then, press Return or click Search. The semantic search returns several matches, as shown in Figure 8-9.
Figure 8-9 Thumbnail Image Results for a Semantic Search
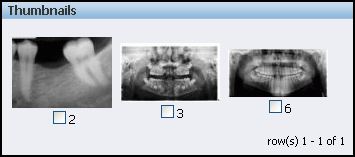
Three thumbnail images are returned as matches because these three DICOM images in the archive contain metadata in the Anatomic Region attribute that is semantically related to the term jaw.
To view the metadata summary for a matching image, rest the mouse on its thumbnail image. For example, Figure 8-10 shows the metadata summary for DICOM image 2.
Figure 8-10 Image Summary Result for a Semantic Search
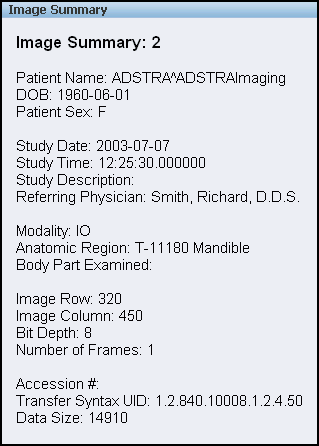
For DICOM image 2, the metadata summary does not include the term jaw. However, the semantically related term Mandible is defined in the Anatomic Region Sequence section of the XML metadata for DICOM image 2. This metadata definition is highlighted in bold in the following code segment.
<SEQUENCE tag="00082218" definer="DICOM" name="Anatomic Region Sequence" offset="654" length="68">
      <ITEM>
         <SHORT_STRING tag="00080100" definer="DICOM" name="Code Value" offset="670"
           length="8">T-11180</SHORT_STRING>
         <SHORT_STRING tag="00080102" definer="DICOM" name="Coding Scheme Designator" offset="686"
           length="4">SNM3</SHORT_STRING>
         <LONG_STRING tag="00080104" definer="DICOM" name="Code Meaning" offset="698"
           length="8">Mandible</LONG_STRING>
      </ITEM>
   </SEQUENCE>
   <SEQUENCE tag="00082228" definer="DICOM" name="Primary Anatomic Structure Sequence" offset="734"
     length="176">
      <ITEM>
         <SHORT_STRING tag="00080100" definer="DICOM" name="Code Value" offset="750"
           length="8">T-54380</SHORT_STRING>
         <SHORT_STRING tag="00080102" definer="DICOM" name="Coding Scheme Designator" offset="766"
           length="4">SNM3</SHORT_STRING>
         <LONG_STRING tag="00080104" definer="DICOM" name="Code Meaning" offset="778"
           length="34">Mandibular left second molar tooth</LONG_STRING>
      </ITEM>
      <ITEM>
         <SHORT_STRING tag="00080100" definer="DICOM" name="Code Value" offset="828"
           length="8">T-54400</SHORT_STRING>
         <SHORT_STRING tag="00080102" definer="DICOM" name="Coding Scheme Designator" offset="844"
           length="4">SNM3</SHORT_STRING>
         <LONG_STRING tag="00080104" definer="DICOM" name="Code Meaning" offset="856"
           length="38">Mandibular left second premolar tooth</LONG_STRING>
      </ITEM>
   </SEQUENCE>
For DICOM image 3, the following XML code segment shows the term Maxilla and mandible in the metadata (highlighted in bold), which is semantically related to the term jaw. (Similar to DICOM image 2, the metadata summary for DICOM image 3 does not include the term jaw.)
<SEQUENCE tag="00082218" definer="DICOM" name="Anatomic Region Sequence" offset="642" length="80">
      <ITEM>
         <SHORT_STRING tag="00080100" definer="DICOM" name="Code Value" offset="658"
           length="8">T-D1217</SHORT_STRING>
         <SHORT_STRING tag="00080102" definer="DICOM" name="Coding Scheme Designator" offset="674"
           length="4">SNM3</SHORT_STRING>
         <LONG_STRING tag="00080104" definer="DICOM" name="Code Meaning" offset="686"
           length="20">Maxilla and mandible</LONG_STRING>
      </ITEM>
   </SEQUENCE>
A common task that clinicians can perform is adding DICOM images to an archive of medical images. You can add your own DICOM images to the installed archive for the Oracle Multimedia DICOM Image Archive Demonstration.
For example, to import one or more of these images into the main archive of the DICOM sample application, follow these steps:
On the DICOM Image Archive Home page, select Add DICOM image to the archive from the Tasks list. Then, click Start to display the Import DICOM Images page shown in Figure 8-11.
On the Import DICOM Images page, click Browse in the DICOM Image File 1: field to locate the first image to import. For this example, select dental image PLANMECA3.dcm.
If this is the only image you want to import, click Import to upload it to the archive. Figure 8-12 shows the changes in some relevant areas on the DICOM Image Archive Home page, after importing dental image PLANMECA3.dcm.
Figure 8-12 Importing an Image as a Clinician
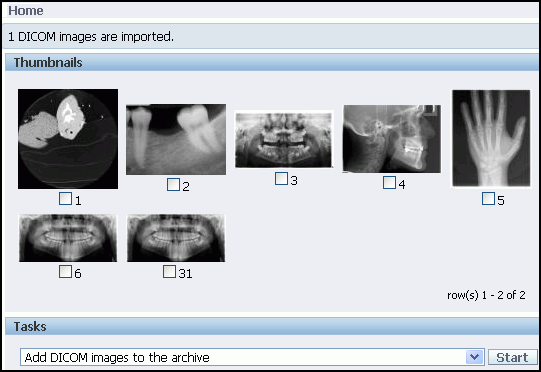
In this example, the message "1 DICOM images are imported." appears at the top of the Home page, and thumbnail image 31 is added to the archive.
Note:
For each image you add to the archive, a thumbnail image appears with the next higher number in the sequence.Rest the mouse on thumbnail image 31 to view the metadata summary. Or, click thumbnail image 31 to display the full-size image and the XML metadata for DICOM image PLANMECA3.dcm.
Use the remaining fields on the Import DICOM Images page (see Figure 8-11) to import additional images (up to five at a time), and then click Import. Or, click Cancel to terminate the operation or Reset to restore the archive to its previous state.
As a researcher, you can perform several processing operations on DICOM images in the archive, including scaling, rotating, and cropping. This example shows how to rotate an image of the lungs to better examine a specific region for further study.
Note:
Researchers are permitted to access only images that contain no patient identifying information.Thus, for use with the examples in this chapter:
The set of DICOM images that is included with the installation software for the Oracle Multimedia DICOM Image Archive Demonstration was imported into the main archive.
Some DICOM images were made anonymous to enable researchers to see them.
For example, to process a DICOM image in the main archive of the DICOM sample application, follow these steps:
On the DICOM Image Archive Home page, select the thumbnail image of the lungs, which has been made anonymous. Then, select Process (Rotate/Scale/Crop) the selected DICOM images from the Tasks list. And, click Start to display the Process DICOM Images page shown in Figure 8-13.
On the Process DICOM Images page, select the processing operations you want to perform. For this example, in the Rotate area, select Rotate counterclockwise in the Operator: field, and enter 180 in the Degree: field. Then, click Process. Or, click Cancel to terminate the operation or Reset to restore the selected image to its previous state.
When you click Process, the DICOM Image Archive Home page displays the processed image, as shown in Figure 8-14.
Figure 8-14 Processing an Image as a Researcher
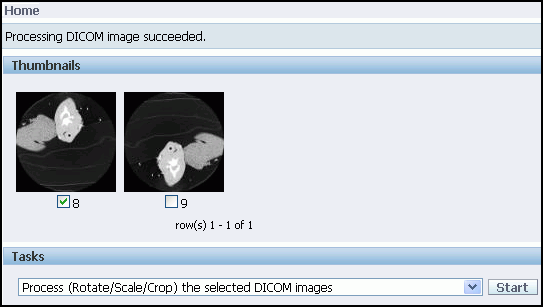
In this example, the message "Processing DICOM image succeeded." appears at the top of the Home page, and the processed image (thumbnail image 9, a rotated view of the lungs) appears in the archive.
Rest the mouse on thumbnail image 9 to view the anonymous metadata summary. Or, click thumbnail image 9 to display the full-size image and the XML metadata for DICOM image 9.
Use the remaining fields on the Process DICOM Images page (see Figure 8-13) to perform other processing operations on selected images, and then click Process. Or, click Cancel to terminate the operation or Reset to restore the archive to its previous state.
Before you can begin to work on any of the administrator tasks, you must log in to the DICOM Image Archive Administration interface.
Figure 8-15 shows the login page for an administrator.
Figure 8-15 Login Page for Administrators

Follow these steps to log in:
Enter your user name in the User Name field.
Enter your password in the Password field.
Click Login.
The DICOM Image Archive Administration Admin Home page appears, as shown in Figure 8-16.
The list of configuration documents included with the Oracle Multimedia DICOM Image Archive Demonstration is shown in the table on the DICOM Image Archive Administration Admin Home page. In the last column, a 1 indicates the Oracle-defined and installed configuration documents, while a 0 indicates the user-defined configuration documents.
As an administrator, you can export, insert, or delete documents in the DICOM repository (see Table 8-2).
A common task that administrators can perform is inserting user-defined configuration documents into the DICOM repository. The installation software for the Oracle Multimedia DICOM Image Archive Demonstration includes a few DICOM configuration documents that you can export from and insert into the installed repository. To insert one or more user-defined configuration documents into the DICOM repository of the DICOM sample application, follow these steps:
On the DICOM Image Archive Administration Admin Home page, select Add. The Add Repository Documents page appears, with the following message:
Select the inserting document category:
In the Document Category field, from the -Select Category- list, select CONSTRAINT. Then, click Add. Or, click Cancel to terminate the operation.
If you click Add, the Add Repository Documents page reappears with the inserting document category indicated. The Browse to select the document files: region includes a list of input fields (Document file 1:, Document file 2:, and Document file 3:).
In the Document file 1: field, click Browse... to locate the first user-defined constraint document you want to insert into the repository. For this example, select the sample constraint file pct_1.xml.
If this is the only constraint document to be inserted into the repository, click Add. Otherwise, use the remaining Document file fields to insert additional constraint documents, and then click Add.
Optionally, you can select another type of configuration document in the Document Category field. Then, click Browse... to locate those files, and repeat these steps until all the documents have been inserted into the repository.
When a document has been inserted successfully, a message appears on the Add Repository Documents page, which indicates the number and type of configuration documents that you inserted into the repository, as shown in Figure 8-17.
Figure 8-17 Add Repository Documents Page
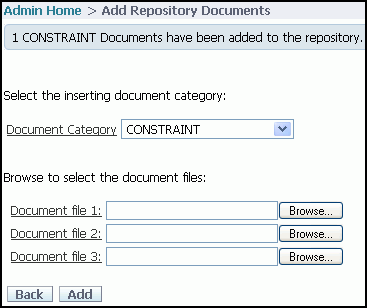
In this example, the message indicates that you inserted one constraint document.
When you are finished inserting documents into the respository, click Back to return to the updated DICOM Image Archive Administration Admin Home page, as shown in Figure 8-18.
Figure 8-18 Administrator Home Page with a New Constraint Document
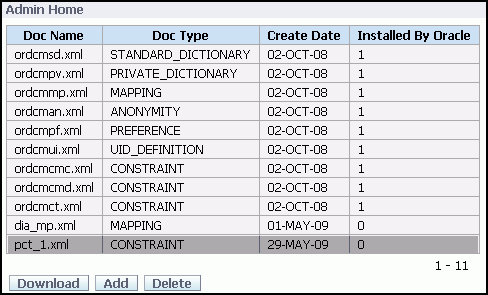
The constraint document you inserted into the repository appears in a new row at the bottom of the table, which is highlighted in this figure. The new table row shows the name of the document (pct_1.xml), the type of document (CONSTRAINT), the creation date (29-MAY-09), and 0 in the Installed By Oracle column. The 0 indicates that the document is user-defined.
To continue inserting other types of configuration documents into the repository from the Add Repository Documents page, select another type of document in the Document Category field, repeating the process described in Steps 2 and 3. Or, begin the process from Step 1 on the DICOM Image Archive Administration Admin Home page (See Figure 8-16).
When the entire process is complete, the documents you inserted into the repository appear at the bottom of the table on the DICOM Image Archive Administration Admin Home page. The new table row for each new document shows the name of the document, type of document, creation date, and a 0 in the Installed By Oracle column to indicate that the document is user-defined (see Figure 8-18).