| Oracle® Application Express Advanced Tutorials Release 3.2 Part Number E11945-01 |
|
|
View PDF |
| Oracle® Application Express Advanced Tutorials Release 3.2 Part Number E11945-01 |
|
|
View PDF |
You can control access to an application, individual pages, or page components by creating an Access Control Administration page. The page contains a list of application modes and an Access Control List.
This tutorial explains how to build an Access Control Administration page and then restrict access to an application so that only privileged users can perform specific functions.
This section contains the following topics:
For additional examples on this topic, please visit the following Oracle by Examples (OBEs):
Adding Security to your Application
http://www.oracle.com/technology/obe/hol08/apexintro/apex3.1.1_d/apex3.1.1_d_otn.htm
You create an access control list by running the Access Control Wizard to create an Access Control Administration page. This page contains a list of application modes and an Access Control List. Once you create the Access Control Administration page, you:
Run the Access Control Administration page.
Select an application mode:
Full access to all, access control list not used.
Restricted access. Only users defined in the access control list are allowed.
Public read only. Edit and administrative privileges controlled by access control list.
Administrative access only.
Add users to the Access Control List.
In addition to creating the Access Control Administration page, the Access Control Wizard also creates:
two tables within the application's default schema to manage access control
the authorization schemes that correspond to the application mode list options
the privileges available in the Access Control List
You can control access to a specific page or page component by selecting one of these authorization schemes on the page or component attributes pages. Once you create an Access Control, you can customize the page, tables and values to suit the specific needs of your application.
First, you need to create an application based on employee data in a spreadsheet.
Topics in this section include:
Download the following *.csv file to you local machine:
In your Web browser go to:
http://www.oracle.com/technology/products/database/application_express/packaged_apps/acl_employees.zip
Download the acl_employees.zip file to your computer.
Unzip and extract the acl_employees.csv file:
Microsoft Windows - Double-click the acl_employees.zip file
UNIX or Linux - Enter the following command:
$ unzip acl_employees.zip
To create a new application based on spreadsheet data:
On the Workspace home page, click the Application Builder icon.
The Application Builder home page appears.
Click Create.
Select Create from Spreadsheet and click Next.
Select Upload file, comma separated (*.csv) or tab delimited and click Next.
For Load Method:
Select Upload file, comma separated (*.csv) or tab delimited.
Click Next.
For Data:
Text File - Click Browse and navigate to the acl_employees.csv file.
Accept the remaining defaults and click Next.
For Table Properties:
Schema - Select the appropriate schema.
Table Name - Enter ACL_EMPLOYEES.
Accept the remaining defaults and click Next.
For User Interface Defaults:
Singular Name - Enter Employee.
Plural Names - Enter Employees.
Click Next.
For Summary Page:
Summary by Column - Select DEPARTMENT_ID and click Next.
Aggregate by Column - Do not make a selection and click Next.
For Application Options, accept the defaults and click Next.
For User Interface, select Theme 2 and click Next.
A theme is collection of templates that define the layout and style of an application. You can change a theme at any time.
Click Create.
The Application home page appears.
To run the application:
Click the Run Application icon as shown in Figure 11-1.
If prompted to enter a user name and password, enter your workspace user name and password and click Login. See "About Application Authentication".
The report appears as shown in Figure 11-2.
The ACL_EMPLOYEES application enables you to view and update employee data. To update a specific record, click the Edit icon in the far left column. Clicking the Analyze tab provides you with access to both a visual and tabular breakdown of the number of employees in each department.
Next, you need to secure your application so that only privileged users can perform certain operations. When you implement access control on an Oracle Application Express application, the best approach is to use an authorization scheme defined at the application level. The first step is to create an access control page by running the Access Control Page Wizard.
Topics in this section include:
To create an access control page:
Click Create on the Developer toolbar.
Select New page and click Next.
For Page, select Access Control and click Next.
The Access Control Wizard appears.
In Administration Page Number, enter 8 and click Next.
For Tabs:
Tab Options - Select Use an existing tab set and create a new tab within the existing tab set.
Tab Set - Select TS1 (Employees, Analyze).
Tab Set Label - Enter Administration.
Click Next.
Review the confirmation page and click Finish.
A Success page appears.
To run the page:
Click Run Page.
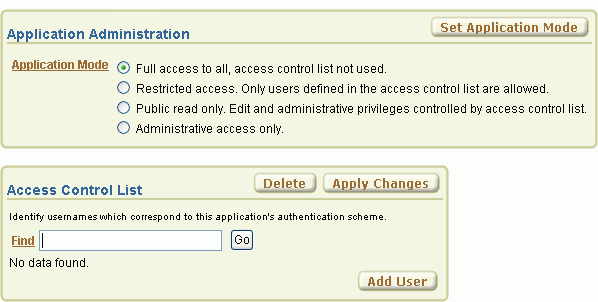
A new page appears as shown in Figure 11-3.
Figure 11-3 Access Control Administration Page

Notice the page is divided into two regions: Application Administration and Access Control List. Also note that the default Application Mode is Full Access.
Under Application Mode, select Restricted access. Only users defined in the access control list are allowed.
Click Set Application Mode.
Next, add three users to the Access Control List:
Luis Popp (LPOPP) will have View privileges.
Adam Fripp (AFRIPP) will have Edit privileges.
John Chen (JCHEN) will have Administrator privileges.
To add users to the Access Control List:
Under Access Control List, click Add User.
A new row appears.
Enter the first user:
Username - Enter LPOPP.
Privilege - Select View.
Click Apply Changes.
Click Add User to add a blank row where you can enter the first user.
Enter the next user:
Username - Enter AFRIPP.
Privilege - Select Edit.
Click Apply Changes.
Click Add User to add a blank row where you can enter the next user.
Enter the next user:
Username - Enter JCHEN.
Privilege - Select Administrator.
Click Apply Changes.
Click Application on the Developer toolbar.
The Application home page appears.
Next, you need to make employees in the ACL_EMPLOYEES table the users of the application. To accomplish this, you create a simple authentication function in the current authentication scheme. Note that the function checks for the userid and its associated last name as a password.
To create the authentication function:
On the Application Builder home page, click the Home breadcrumb link.
The the Workspace home page appears.
Click SQL Workshop and then SQL Commands.
In the SQL editor pane:
Enter the following code:
CREATE OR REPLACE FUNCTION acl_custom_auth (
    p_username IN VARCHAR2,
    p_password IN VARCHAR2)
RETURN BOOLEAN IS
BEGIN
  FOR c1 IN (SELECT 1
              FROM acl_employees
             WHERE upper(userid) = upper(p_username)
               AND upper(last_name) = upper(p_password))
  LOOP
    RETURN TRUE;
  END LOOP;
  RETURN FALSE;
END;
/
Click Run.
Click the Home breadcrumb link.
The Workspace home page appears.
Next, you need to update the current authentication scheme to use the new function.
To update the current authentication scheme.
Click Application Builder and then click ACL Employees.
The Application home page appears.
Click Shared Components.
Under Security, click Authentication Schemes.
The Authentication Schemes page appears.
Click the Application Express - Current icon.
Scroll down to Login Processing.
In Authentication Function, replace -BUILTIN- with the following:
return acl_custom_auth
Scroll back to the top of the page and click Apply Changes.
Next you need to associate the authorization scheme with the appropriate application components. As you may recall, you previously added three users to the Access Control List:
LPOPP had View privileges.
AFRIPP had Edit privileges
JCHEN had Administrator privileges
In this exercise, you associate the View, Edit, and Administrator privileges with specific application components to control which users are allowed to perform what actions.
Topics in this section include:
First, you need to specify that users will only be able to access the application if they have View privileges. To accomplish this, you associate the access control - view authorization scheme with the application.
To associate an authorization scheme with your application:
Click the Application ID breadcrumb link.
The Application home page appears.
Click Shared Components.
Under Application, click Definition.
Click the Security tab.
Scroll down to Authorization.
From Authorization Scheme, select access control - view.
Click Apply Changes at the top of the page.
For this exercise, only users with at least Edit privileges should be able to edit or delete data. To accomplish this, you associate the access control - edit authorization scheme with the ID column. This hides the Edit icon on page 1 for users with View privileges, but displays it for users with Edit or Administrator privileges.
To associate edit privileges with the ID column:
Click the Application ID breadcrumb link.
The Application home page appears.
Click 1 - Report Page.
The Page Definition for page 1 appears.
Under Regions, click the Report link.
The Report Attributes page appears.
Click the Edit icon for ID. The Edit icon resembles a small page with a pencil on top of it.
The Column Attributes page appears.
Scroll down to Authorization.
From Authorization Scheme, select access control - edit.
Click Apply Changes at the top of the page.
Next, associate the access control - edit authorization scheme to the Create button. This will hide the Edit icon for unprivileged users.
To associate edit privileges with the Create button:
Go to the Page Definition for Page 1. Click the Page 1 breadcrumb link.
The Page Definition for page 1 appears.
Under Buttons, click the Create link (not the icon).
Scroll down to Authorization.
From Authorization Scheme, select access control - edit.
Click Apply Changes at the top of the page.
The Page Definition for Page 1 appears.
Next, associate the access control - edit authorization scheme with page 2.
To specify an authorization scheme for page 2:
Go to page 2. In the Page field enter 2 and click Go.
The Page Definition for page 2 appears.
Under Page, click the Edit page attributes icon.
Scroll down to Security.
From Authorization Scheme, select access control - edit.
Click Apply Changes at the top of the page.
Lastly, you need to restrict access to page 8, Access Control Administration. To accomplish this, you specify the access control - administrator authorization scheme with all of page 8 and with the Administration tab.
To specify an authorization scheme for page 8:
Go to page 8. In the Page field, enter 8 and click Go.
The Page Definition for page 8 appears.
Under Page, click the Edit page attributes icon.
Scroll down to Security.
From Authorization Scheme, select access control - administrator.
Click Apply Changes at the top of the page.
The Page Definition for page 8 appears.
To specify an authorization scheme for page 8:
Under Tabs, click the Administration link.
Scroll down to Authorization.
From Authorization Scheme, select access control - administrator.
Click Apply Changes at the top of the page.
The Page Definition for page 8 appears.
At the beginning of this tutorial, you added three users to the Access Control List:
Luis Popp (LPOPP) has View privileges
Adam Fripp (AFRIPP) has Edit privileges
John Chen (JCHEN) has Administrator privileges
Next, test your application by logging in as each of these users.
Topics in this section include:
Luis Popp (LPOPP) has View privileges.
To log in as Luis Popp:
Click the Run Page icon in the upper right corner.
When prompted, specify the following:
Username - LPOPP.
Password - Popp.
Click Login.
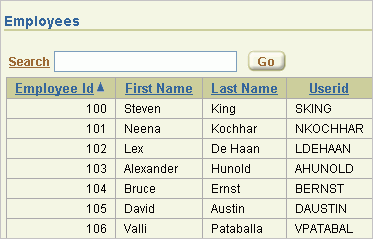
The Employees Report page appears as shown in Figure 11-4.
Figure 11-4 Employees Report with View Privileges

Note that the Edit icon and the Administration tab no longer appear.
Click Logout in the upper right corner.
Adam Fripp (AFRIPP) has Edit privileges.
To log in as Adam Fripp:
When prompted, specify the following:
Username - AFRIPP.
Password - Fripp.
Click Login.
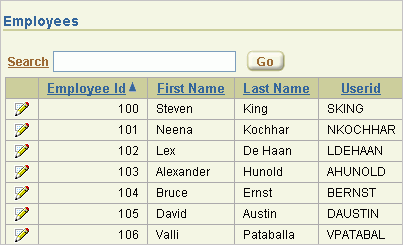
The Employees Report page appears as shown in Figure 11-5.
Figure 11-5 Employees Report with Edit Privileges

Note that the Edit icon now appears to the left of the Employee Id column, but the Administration tab still does not appear.
Click Logout in the upper right corner.
John Chen (JCHEN) has Administrator privileges.
To log in as John Chen:
When prompted, specify the following:
Username - JCHEN
Password - Chen
Click Login.
The Employees Report page appears as shown in Figure 11-6.
Figure 11-6 Employees Report with Administrator Privileges

Click Administrator tab.