| Oracle® Database 2 Day + Data Warehousing Guide 11g Release 2 (11.2) Part Number E10578-02 |
|
|
View PDF |
| Oracle® Database 2 Day + Data Warehousing Guide 11g Release 2 (11.2) Part Number E10578-02 |
|
|
View PDF |
After you create and import data object definitions in Oracle Warehouse Builder, you can design extraction, transformation, and loading (ETL) operations that move data from sources to targets. In OWB, you design these operations in a mapping.
This section contains the following topics:
Mappings describe a series of operations that extract data from sources, transform it, and load it into targets. They provide a visual representation of the flow of the data and the operations performed on the data. When you design a mapping in OWB, you use the Mapping Editor interface.
The basic design element for a mapping is the operator. Use operators to represent sources and targets in the data flow. Also use operators to define how to transform the data from source to target. The operators you select as sources have an impact on how you design the mapping. Based on the operators you select, OWB assigns the mapping to one of the following Mapping Generation Languages:
PL/SQL
SQL*Loader
ABAP
Each of these code languages require you to adhere to certain rules when designing a mapping.
This guide illustrates how to define a PL/SQL mapping. To define the other types of mappings, refer to the Oracle Warehouse Builder User's Guide. A basic rules for defining a PL/SQL mapping is as follows: PL/SQL mappings can contain any type of source operator other a flat file operator or a SAP/R3 source.
To define a mapping, refer to the following sections:
Configuring Mappings Reference in the Warehouse Builder Online Help
When you are satisfied with the mapping design, generate the code by selecting the Generate icon in the toolbar.
Subsequent Steps
After you design a mapping and generate its code, you can next create a process flow or proceed directly with deployment followed by execution.
Use process flows to interrelate mappings. For example, you can design a process flow such that the completion of one mapping triggers an email notification and launches another mapping.
Deploy the mapping, and any associated process flows you created, and then execute the mapping.
To create a mapping:
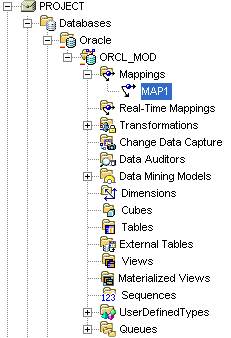
Navigate to the Mappings node in the Projects Navigator. This node is located under a warehouse target module, under the Databases folder, under the Oracle folder.
Figure 5-1 Mappings Node on the Projects Navigator
Right-click Mappings and then select New.
OWB opens the Create Mapping dialog box.
Enter a name and an optional description for the new mapping.
Select Help to review the rules on naming and describing mappings.
Click OK.
OWB stores the definition for the mapping and inserts its name in the Projects Navigator. OWB opens a mapping editor for the mapping and displays the name of the mapping in the title bar.
To open a previously created mapping:
From the Projects Navigator, locate a warehouse target module under the Databases folder and then under the Oracle Database folder.
Expand the Mappings node.
Open the Mapping Editor in one of the following ways:
Double-click a mapping.
Select a mapping and then from the Edit menu, select Open Editor.
Select a mapping and press Ctrl + O.
Right-click a mapping, and select Open Editor.
OWB displays the Mapping Editor.
As you design a mapping, you select operators from the Mapping Editor palette and drag them onto the canvas.
Oracle source/target operators: Use these operators represent Oracle Database objects such as Oracle tables, views, materialized views.
Remote and Non-Oracle Source and Target Operators: The use of these operator have special requirements.
Data flow operators: Use data flow operators to transform data.
Pre/Post Processing operators: Use these operators to perform processing before or after executing a mapping. The Mapping parameter operator is used to provide values to and from a mapping.
Pluggable mapping operators: A pluggable mapping is a reusable grouping of mapping operators that behaves as a single operator.
The steps you take to add an operator to a mapping depend on the type of operator you select. This is because some operators are bound to workspace objects while others are not. As a general rule, when you add a data source or target operator, OWB creates and maintains a version of that object in the OWB workspace and a separate version for the Mapping Editor. For example, when you add a table operator to a mapping, OWB maintains a separate copy of the table in the workspace. The separate versions are said to be bound together. That is, the version in the mapping is bound to the version in the workspace.
To distinguish between the two versions, this section refers to objects in the workspace either generically as workspace objects or specifically as workspace tables, workspace views, and so on. And this section refers to operators in the mapping as table operators, view operators, and so on. Therefore, when you add a dimension to a mapping, refer to the dimension in the mapping as the dimension operator and refer to the dimension in the workspace as the workspace dimension.
OWB maintains separate workspace objects for some operators so that you can synchronize changing definitions of these objects. For example, when you re-import a new metadata definition for the workspace table, you may want to propagate those changes to the table operator in the mapping. Conversely, as you make changes to a table operator in a mapping, you may want to propagate those changes back to its associated workspace table. You can accomplish these tasks by a process known as synchronizing. In OWB, you can synchronize automatically. Alternatively, synchronize manually from within the Mapping Editor.
To add an operator to a mapping:
Open the Mapping Editor.
From the Mapping menu, select Add and select an operator. Alternatively, you can drag an operator icon from the toolbox and drop it onto the Mapping Editor canvas.
If you select an operator that you can bind to a workspace object, the Mapping Editor displays the Add Mapping <operator name> dialog box. For details on how to use this dialog box, select Help.
If you select an operator that you cannot bind to a workspace object, OWB may display a wizard or dialog box to assist you in creating the operator.
Follow any prompts OWB displays and click OK.
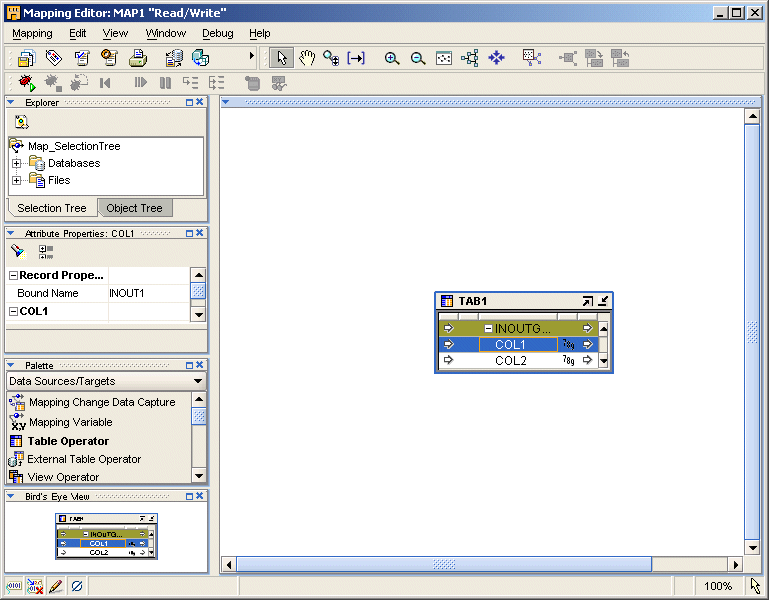
The Mapping Editor displays the operator maximized on the canvas. The operator name appears in the upper left corner. You can view each attribute name and data type.
If you want to minimize the operator, click the arrow in the upper right corner and the Mapping Editor displays the operator as an icon on the canvas.
Figure 5-2 Mapping Editor Showing a Table Operator Source
When you add an operator that you can bind to a workspace object, the Mapping Editor displays the Add Mapping <operator name> dialog box. Select one of the following options:
Use this option when you want to use the Mapping Editor to define a new workspace object such as a new staging area table or a new target table.
After you select Create Unbound Operator with No Attributes, type a name for the new object. OWB displays the operator on the canvas without any attributes.
You can now add and define attributes for the operator as described in "Editing Operators". Next, to create the new workspace object in a target module, right-click the operator and select Create and Bind.
For an example on how to use this option in a mapping design, see "Example: Using the Mapping Editor to Create Staging Area Tables".
Use this option when you want to add an operator based on an object you previously defined or imported into the workspace.
Either type the prefix to search for the object or select from the displayed list of objects within the selected module.
To select multiple items, press the Control key as you click each item. To select a group of items located in a series, click the first object in your selection range, press the Shift key, and then click the last object.
You can add operators based on workspace objects within the same module as the mapping or from other modules. If you select a workspace object from another module, the Mapping Editor creates a connector if one does not already exist. The connector establishes a path for moving data between the mapping location and the location of the workspace object.
Each operator has an editor associated with it. Use the operator editor to specify general and structural information for operators, groups, and attributes. In the operator editor you can add, remove, or rename groups and attributes. You can also rename an operator.
Editing operators is different from assigning loading properties and conditional behaviors. To specify loading properties and conditional behaviors, use the properties windows as described in "Setting Operator, Group, and Attribute Properties".
To edit an operator, group, or attribute:
Select an operator from the Mapping Editor canvas.
Or select any group or attribute within an operator.
Right-click and select Open Details.
The Mapping Editor displays the operator editor with the Name Tab, Groups Tab, and Input and Output Tabs for each type of group in the operator.
Some operators include additional tabs. For example, the Match Merge operator includes tabs for defining Match rules and Merge rules.
Follow the prompts on each tab and click OK when you are finished.
Select Help if you need additional information for completing a tab.
After you select mapping source operators, operators that transform data, and target operators, you are ready to connect them. Data flow connections graphically represent how the data flows from a source, through operators, and to a target.
You can connect operators by one of the following methods:
Connecting Attributes: Connect individual operator attributes to each other one at a time.
Connecting Groups: Define criteria for connecting all the attributes between two groups.
Using an Operator Wizard: For operators such as the Pivot operator and Name-Address operator, you can use the wizard to define data flow connections.
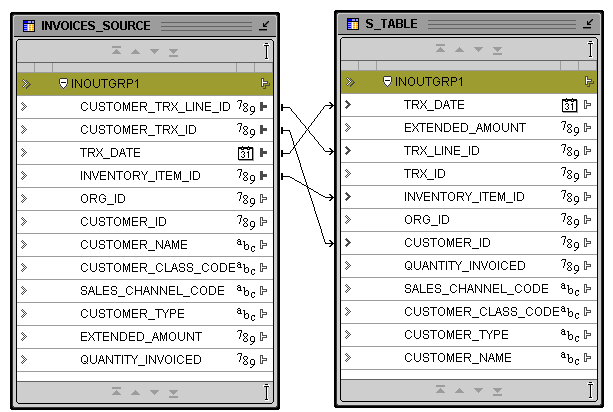
You can draw a line from a single output attribute of one operator to a single input attribute of another operator.
To connect attributes:
Click and hold down the mouse button while the pointer is positioned over an output attribute.
Drag the mouse away from the output attribute and toward the input attribute to which you want data to flow.
As you drag the mouse, a line appears on the Mapping Editor canvas to indicate a connection.
Release the mouse over the input attribute.
Repeat steps 1 through 3 until you create all the required data flow connections.
Figure 5-3 Connected Operators in a Mapping
When connecting attributes, keep the following rules in mind:
You cannot connect to the same input attribute twice.
You cannot connect attributes within the same operator.
You cannot connect out of an input only attribute nor can you connect into an output only attribute.
You cannot connect operators in such a way as to contradict an established cardinality. Instead, use a Joiner operator.
When you connect groups, the Mapping Editor assists you by either automatically copying the attributes or prompts you for more information.
If you connect from one operator group to a target group with no existing attributes, the Mapping Editor automatically copies the attributes and connects the attributes. This is useful for designing mappings such shown in "Example: Using the Mapping Editor to Create Staging Area Tables".
You can use the Mapping Editor with an unbound table operator to quickly create staging area tables.
The following instructions describe how to create a staging table based on an existing source table. You can also use these instructions to create views, materialized views, flat files, and transformations.
To map a source table to a staging table:
In the Mapping Editor, add a source table.
From the menu bar, select Mapping, select Add, then select Data Sources/Targets. In the Data Sources/Targets menu, select Table Operator.
Use the Add Table Operator dialog box to select and bind the source table operator in the mapping. From the Add Table Operator dialog box, select Create unbound operator with no attributes.
Figure 5-4 Unbound Staging Table without Attributes and Source Table
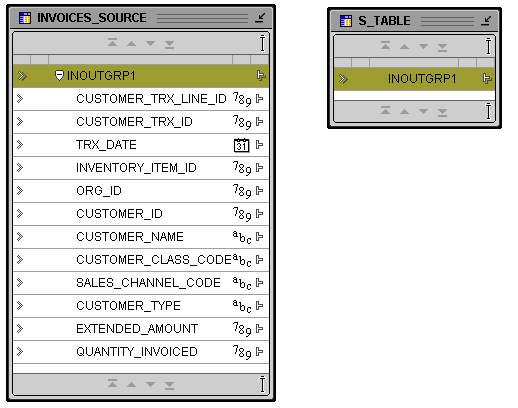
With the mouse button positioned over the group in the source operator, click and hold down the mouse button.
Drag the mouse to the staging area table group.
OWB copies the source attributes to the staging area table and connects the two operators.
In the Mapping Editor, select the unbound table you added to the mapping. Right-click and select Create and Bind.
In Create in, specify the target module in which to create the table.
OWB creates the new table in the target module you specify.
When you select white space on the mapping canvas, the editor displays the mapping properties in the property inspector along the left side. You can set the following property for the mapping:
If your mapping includes only one target or is a SQL*Loader or ABAP mapping, target load ordering does not apply. Accept the default settings and continue with your mapping design.
When you design a PL/SQL mapping with multiple targets, OWB calculates a default ordering for loading the targets. If you define foreign key relationships between targets, OWB creates a default order that loads the parent and then the child. If you do not create foreign key relationships or if a target table has a recursive relationship, OWB assigns a random ordering as the default.
You can override the default load ordering by setting the Target Load Order property. If you make a mistake when reordering the targets, you can restore the default ordering by selecting the Reset to Default option.
To specify the loading order for multiple targets:
Click whitespace in the mapping canvas to view the mapping properties in the Property Window in the upper right corner.
Go to the Map Targets Load Order property and click the Ellipsis button on the right side.
To change the loading order, select a target and use the shuttle buttons on the right to move the target up or down on the list.
When you select an object on the canvas, the editor displays its associated properties in the property inspector along the left side.
Figure 5-7 Property Inspector for a Table Operator
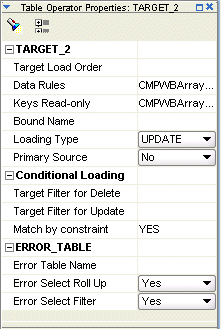
You can view and set the following types of properties:
Operator Properties: Properties that affect the operator as a whole. The properties you can set depend upon the operator type.
Group Properties: Properties that affect a group of attributes. Most operators do not have properties for their groups. Examples of operators that do have group properties include the splitter operator and the deduplicator.
Attribute Properties: Properties that pertain to attributes in source and target operators. Examples of attribute properties are data type, precision, and scale.
Many of the operators you use in a mapping have corresponding definitions in the OWB workspace. This is true of source and target operators such as table and view operators. This is also true of other operators such as sequence and transformation operators whose definitions you may want to use across multiple mappings. As you make changes to these operators, you may want to propagate those changes back to the workspace object.
You have the following choices in deciding the direction in which you propagate changes:
Synchronizing From a Workspace Object to an Operator: After you begin using mappings in a production environment, there may be changes to the sources or targets that impact your ETL designs. Typically, the best way to manage these changes is through the OWB Dependency Manager described in the Warehouse Builder Online Help. Use the Dependency Manager to automatically evaluate the impact of changes and to synchronize all effected mappings at one time. Alternatively, in the Mapping Editor, you can manually synchronize objects as described in "Synchronizing From a Workspace Object to an Operator".
Synchronizing from an Operator to a Workspace Object: When you make changes to an operator in a mapping, you may want to propagate those changes to its corresponding workspace definition. For example, the sources you imported and used in a mapping may have complex physical names for its attributes.
Note that synchronizing is different from refreshing. The refresh command ensures that you are up-to-date with changes made by other users in a multiuser environment. Synchronizing matches operators with their corresponding workspace objects.
To synchronize, select a single operator and synchronize it with the definition of a specified workspace object.
To synchronize an operator, complete the following steps:
Select an operator on the Mapping Editor canvas.
From the Edit menu, select Synchronize or right-click the header of the operator and select Synchronize.
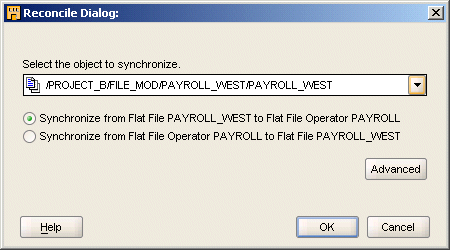
By default, OWB selects the option for you to synchronize your selected operator with its associated object in the workspace. You can accept the default or select another workspace object from the list box.
In this step you also specify either Synchronizing From a Workspace Object to an Operator or select the option for Synchronizing from an Operator to a Workspace Object.
As an optional step, click Advanced to set the Matching Strategies.
Select Help for instruction on how to use the Matching Strategies.
Click OK.
In the Mapping Editor, you can synchronize from a workspace object for any of the following reasons:
Manually propagate changes: Propagate changes you made in a workspace object to its associated operator. Changes to the workspace object can include structural changes, attribute name changes, attribute data type changes. To automatically propagate changes in a workspace object across multiple mappings, see in the Warehouse Builder Online Help.
Synchronize an operator with a new workspace object: You can associate an operator with a new workspace object if, for example, you migrate mappings from one version of a data warehouse to a newer version and maintain different object definitions for each version.
Figure 5-9 Synchronizing from a Different Workspace Object
Prototype mappings using tables: When working in the design environment, you could choose to design the ETL logic using tables. However, for production, you may want to the mappings to source other workspace object types such as views, materialized views, or cubes.
Table 5-1 lists operators and the types of workspace objects from which you can synchronize.
Table 5-1 Operators Synchronized with Workspace Objects
| To: Operator | From: Workspace Object Type |
|---|---|
|
Cube Operator |
Tables, Views, Materialized Views, Flat Files, Dimensions and Cubes |
|
Dimension Operator |
Tables, External Tables, Views, Materialized Views, Flat Files, Dimensions and Cubes |
|
External Table Operator |
Tables, External Tables, Views, Materialized Views, Flat Files, Dimensions and Cubes |
|
Flat File Operator |
Tables, External Tables, Views, Materialized Views, Flat Files, Dimensions and Cubes |
|
Key Lookup Operator |
Tables only |
|
Materialized View Operator |
Tables, External Tables, Views, Materialized Views, Files, Dimensions and Cubes |
|
Post Mapping Process Operator |
Transformations only |
|
Pre Mapping Process Operator |
Transformations only |
|
Sequence Operator |
Sequences only |
|
Table Operator |
Tables, External Tables, Views, Materialized Views, Flat Files, Dimensions and Cubes |
|
Transformation Operator |
Transformations only |
|
View Operator |
Tables, External Tables, Views, Materialized Views, Files, Dimensions and Cubes |
Note that when you synchronize from an external table operator, OWB updates the operator based on the workspace external table only and not its associated flat file.
As you make changes to operators in a mapping, you may want to propagate those changes back to a workspace object. By synchronizing, you can propagate changes from the following operators: tables, views, materialized views, transformations, and flat file operators.
Synchronize from the operator to a workspace object for any of the following reasons:
Propagate changes: Propagate changes you made in an operator to its associated workspace object. When you rename the business name for an operator or attribute, OWB propagates the first 30 characters of the business name as the bound name.
Replace workspace objects: Synchronize to replace an existing workspace object.
Synchronizing from an operator has no impact on the dependent relationship between other operators and the workspace objects.