| Oracle® Database 2 Day DBA 11g Release 2 (11.2) Part Number E10897-01 |
|
|
View PDF |
| Oracle® Database 2 Day DBA 11g Release 2 (11.2) Part Number E10897-01 |
|
|
View PDF |
Oracle Enterprise Manager Database Control (Database Control) includes a feature called the Support Workbench that enables you to view and investigate critical database errors, report these errors to Oracle Support Services, and in some cases, resolve the errors.
This chapter explains critical errors and describes how to use the Database Home page and the Support Workbench to do the following:
View critical error alerts
View diagnostic data for critical errors
Package diagnostic data for upload to Oracle Support Services
Create and track a service request
Repair some classes of critical errors
The following topics are covered:
To help diagnosis and resolution of critical errors, Oracle Database Release 11g introduces two concepts for Oracle Database: problems and incidents.
A problem is a critical error in the database. Critical errors manifest as internal errors, such as ORA-00600, and other severe errors, such as ORA-07445 (operating system exception) or ORA-04031 (out of memory in the shared pool portion). Problems are tracked in the Automatic Diagnostic Repository (ADR). The ADR is a file-based repository for storing diagnostic data. Because this repository is stored outside the database, the diagnostic data is available even when the database is down. As of Release 11g, the alert log, all trace and dump files, and other diagnostic data are also stored in the ADR.
Each problem has a problem key, which is a text string that describes the problem. The problem key includes the error code (such as ORA 600), and in some cases, one or more error parameter values or other information.
An incident is a single occurrence of a problem. When a problem occurs multiple times, an incident is created for each occurrence. Incidents are timestamped and tracked in the Automatic Diagnostic Repository (ADR).
Each incident is identified by a numeric incident ID, which is unique within the ADR. When an incident occurs, the database performs the following steps:
Makes an entry in the alert log.
Sends an incident alert to Enterprise Manager.
Gathers first-failure diagnostic data about the incident (such as trace files).
Tags the diagnostic data with the incident ID.
Stores the data in an ADR subdirectory created for that incident.
Each incident has a problem key and is mapped to a single problem.
Diagnosis and resolution of a critical error usually starts with an incident alert. The incident alert is displayed on the Enterprise Manager Database Home page. You can then view the problem and its associated incidents with Enterprise Manager.
See Also:
Oracle Database Administrator's Guide for more information about the ADR
This section describes the typical set of tasks that you perform to investigate and report a problem (critical error), and in some cases, resolve the problem. It includes the following topics:
Task 4 – Package and Upload Diagnostic Data to Oracle Support Services
Task 5 – Track the Service Request and Implement Any Repairs
Note:
The workflow described in this section includes only the minimum tasks that are required to investigate, report, and in some cases, repair a problem. See Oracle Database Administrator's Guide for a more complete workflow that includes additional diagnostics-gathering activities and data customization activities that you can do before uploading the diagnostic data to Oracle Support Services. In some cases, these additional activities may result in a shorter time to problem resolution.You can begin investigating a problem by starting from the Support Workbench Home page. However, the more typical workflow begins with a critical error alert on the Database Home page. This documentation provides an overview of that workflow.
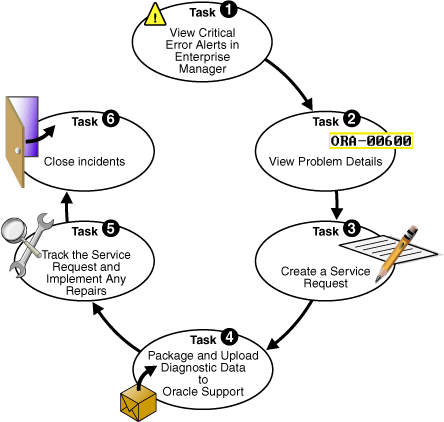
Figure 11-1 illustrates the basic tasks that you complete when encountering a problem.
Figure 11-1 Workflow for Investigating, Reporting, and Resolving a Problem
The following are task descriptions. Subsequent sections provide details for each task.
Task 1 – View Critical Error Alerts in Enterprise Manager
Start by accessing the Database Home page in Enterprise Manager, and reviewing critical error alerts. Select an alert for which to view details. From the alert details page, go to the Problem Details page.
Examine the problem details and view a list of incidents that were recorded for the problem. Display findings from any health checks that were automatically run.
Task 3 – (Optional) Create a Service Request
Create a service request using My Oracle Support and optionally record the service request number with the problem information. If you skip this step, then you can create a service request later, or the Support Workbench can create one for you.
Task 4 – Package and Upload Diagnostic Data to Oracle Support Services
Invoke a guided workflow (a wizard) that automatically packages all gathered diagnostic data for a problem and uploads the data to Oracle Support Services.
Task 5 – Track the Service Request and Implement Any Repairs
Optionally maintain an activity log for the service request in the Support Workbench. If appropriate, run Oracle advisors to help repair SQL failures or corrupted data.
Set the status for one, some, or all incidents for the problem to Closed.
You begin the process of investigating problems (critical errors) by reviewing critical error alerts on the Database Home page.
To view critical error alerts:
Go to the Database Home page in Enterprise Manager.
In the Alerts section, examine the table of alerts.
Critical error alerts are indicated by an X in the Severity column, and the text "Incident" in the Category column.
Note:
You may have to click the hide/show arrowhead icon next to the Alerts heading to display the alerts table.
(Optional) In the Category list, select Incident to view alerts of type Incident only.
In the Message column, click the message of the critical error alert to investigate.
An Incident detail or Data Failure page appears for the type of incident you selected. For example, if you clicked a message about an ORA-600 error, then the Incident - Generic Internal Error page appears.
This page displays:
Problem information, including the number of incidents for the problem
A Performance and Critical Error graphical timeline for the 24-hour time period in which the critical error occurred
Alert details, including severity, timestamp, and message
Controls that enable you to clear the alert or record a comment about it
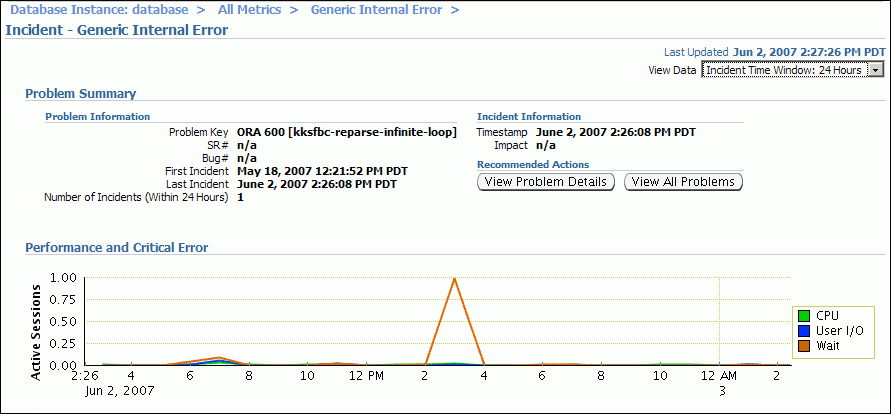
Review the Performance and Critical Error graphical timeline, and note any time correlation between performance issues and the critical error. Optionally clear the alert or leave a comment about it.
Perform one of the following actions:
To view the details of the problem associated with the critical error alert that you are investigating, proceed with Task 2 – View Problem Details.
If the graphical timeline shows a large number of different problems during the 24-hour time period and you want to view a summary of all those problems, then complete these steps:
Click View All Problems.
The Support Workbench Home page appears.
View problems and incidents as described in "Viewing Problems Using the Enterprise Manager Support Workbench".
Select a single problem and view problem details, as described in "Viewing Problems Using the Enterprise Manager Support Workbench".
Continue with Task 3 – (Optional) Create a Service Request.
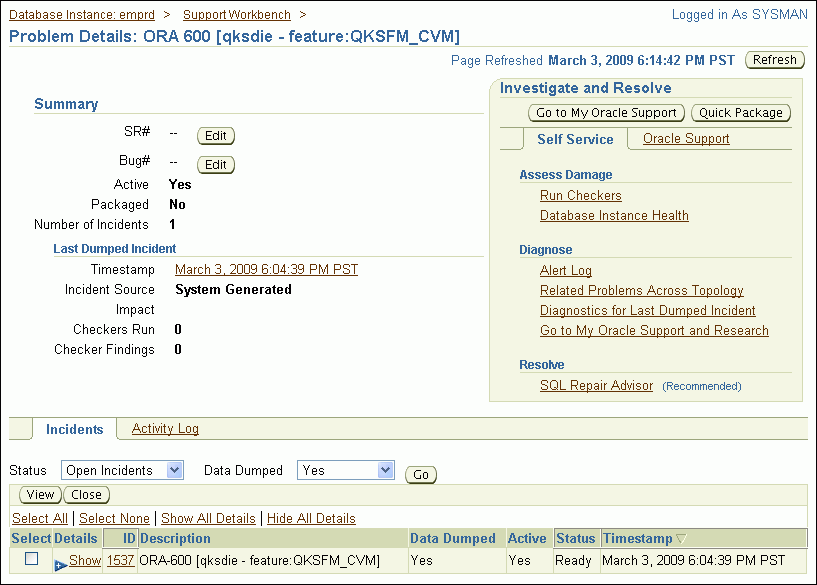
You continue your investigation with the Problem Details page.
To view problem details:
On the Incident detail or Data Failure page, click View Problem Details.
The Problem Details page appears, showing the Incidents subpage.
(Optional) To view incident details, in the Incidents subpage, select an incident, and then click View.
The Incident Details page appears, showing the Dump Files subpage.
(Optional) On the Incident Details page, click Checker Findings to view the Checker Findings subpage.
This page displays findings from any health checks that were automatically run when the critical error was detected.
See Also:
Oracle Database Administrator's Guide for information about health checks and checker findings
At this point, you can create an Oracle Support service request and record the service request number with the problem information. If you choose to skip this task, then the Support Workbench automatically creates a draft service request for you in Task 4.
To create a service request:
On the Problem Details page, in the Investigate and Resolve section, click Go to My Oracle Support.
The My Oracle Support Login and Registration page appears in a new browser window.
Log in to My Oracle Support and create a service request in the usual manner.
(Optional) Remember the service request number (SR#) for the next step.
(Optional) Return to the Problem Details page, and then do the following:
In the Summary section, click the Edit button that is adjacent to the SR# label.
In the page that opens, enter the SR#, and then click OK.
The SR# is recorded in the Problem Details page. This is for your reference only.
For this task, you use the quick packaging process of the Support Workbench to package and upload the diagnostic information for the problem to Oracle Support Services. Quick packaging has a minimum of steps, organized in a guided workflow (a wizard). The wizard assists you with creating an incident package (referred to as a package) for a single problem, creating a ZIP file from the package, and uploading the file. With quick packaging, you are not able to edit or otherwise customize the diagnostic information that is uploaded. Using quick packaging is the direct, straightforward method to package and upload diagnostic data.
To edit or remove sensitive data from the diagnostic information, enclose additional user files (such as application configuration files or scripts), or perform other customizations before uploading, you must use the custom packaging process. See Oracle Database Administrator's Guide for instructions. When you complete those instructions, you may continue with Task 5 – Track the Service Request and Implement Any Repairs.
Note:
The Support Workbench uses Oracle Configuration Manager to upload the diagnostic data. If Oracle Configuration Manager is not installed or properly configured, then the upload may fail. In this case, a message is displayed with a request that you upload the file to Oracle Support manually. You can upload files manually with My Oracle Support.For more information about Oracle Configuration Manager, see Oracle Configuration Manager Installation and Administration Guide.
To package and upload diagnostic data to Oracle Support:
On the Problem Details page, in the Investigate and Resolve section, click Quick Package.
The Create New Package page of the Quick Packaging wizard appears.
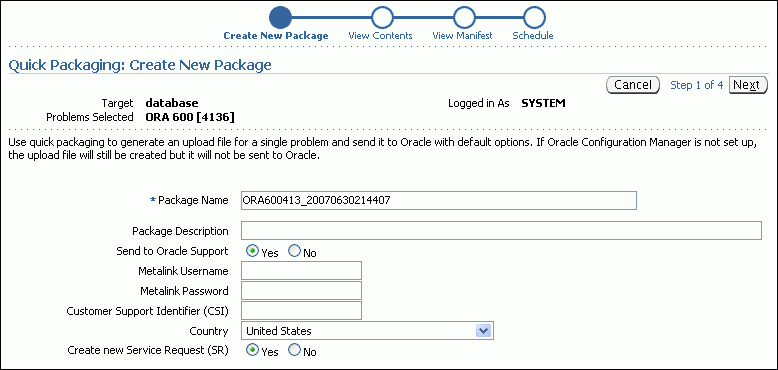
(Optional) Enter a package name and description.
Fill in the remaining fields on the page. If you have created a service request for this problem, then select No next to Create new Service Request (SR).
If you select Yes, then the Quick Packaging wizard creates a draft service request on your behalf. You must later log in to My Oracle Support and fill in the details of the service request.
Click Next, and then proceed with the remaining pages of the Quick Packaging wizard.
When the Quick Packaging wizard is complete, the package that it creates remains available in the Support Workbench. You can then modify it with custom packaging operations (such as adding new incidents) and reupload the package at a later time.
After uploading diagnostic information to Oracle Support Services, you might perform various activities to track the service request, to collect additional diagnostic information, and implement repairs. Among these activities are the following:
Adding an Oracle bug number to the problem information.
To do so, on the Problem Details page, click the Edit button that is adjacent to the Bug# label. This is for your reference only.
Adding comments to the problem activity log.
You may want to share problem status or history information with other DBAs in your organization. For example, you could record the results of your conversations with Oracle Support.
To add comments to the problem activity log:
Go to the Problem Details page for the problem, as described in "Viewing Problems Using the Enterprise Manager Support Workbench".
Click Activity Log to display the Activity Log subpage.

In the Comment field, enter a comment, and then click Add Comment.
Your comment is recorded in the activity log.
Adding new incidents, if they occur, to the package and reuploading the package to Oracle Support Services.
For this activity, you must use the custom packaging method described in Oracle Database Administrator's Guide.
Running health checks.
See Oracle Database Administrator's Guide for information about health checks.
Running a suggested Oracle advisor to implement repairs.
You can access the suggested advisor in one of the following ways:
Problem Details page—In the Self-Service tab of the Investigate and Resolve section
Support Workbench Home page—On the Checker Findings subpage
Incident Details page—On the Checker Findings subpage
Table 11-1 lists the advisors that help repair critical errors.
When a particular incident is no longer of interest, you can close it. By default, closed incidents are not displayed on the Problem Details page.
All incidents, whether closed or not, are purged after 30 days. You can disable purging for an incident on the Incident Details page.
To close incidents:
Go to the Support Workbench Home page.
See "Viewing Problems Using the Enterprise Manager Support Workbench".
Select the desired problem, and then click View.
The Problem Details page appears.
Select the incidents to close and then click Close.
A confirmation page appears.
Enter an optional comment and then click OK.
You use the Enterprise Manager Support Workbench home page to view all problems or only those within a specified time period.
To access the Support Workbench home page:
Go to the Database Home page in Enterprise Manager.
Click Software and Support to view the Software and Support page.
In the Support section, click Support Workbench.
The Support Workbench home page appears, showing the Problems subpage. By default the problems from the last 24 hours are displayed.
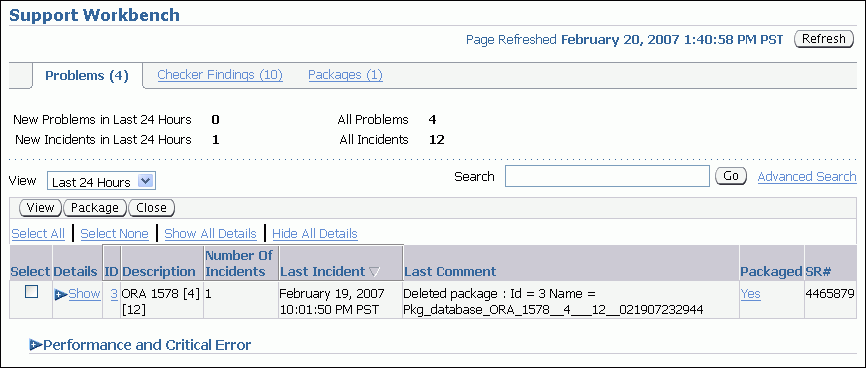
To view all problems, select All from the View list.
(Optional) If the Performance and Critical Error section is hidden, then click the Show/Hide icon adjacent to the section heading to show the section.
This section enables you to view any correlation between performance changes for your database and incident occurrences.
(Optional) Under the Details column, click Show to display a list of all incidents for a problem, and then click an incident ID to display the Incident Details page.
To view details for a particular problem:
On the Support Workbench home page, select the problem, and then click View.
The Problem Details page appears, showing the Incidents subpage.
(Optional) To view closed incidents and open incidents, select All from the View list.
(Optional) To view details for an incident, select the incident, and then click View.
The Incident Details page appears.
(Optional) To view checker findings for the incident, on the Incident Details page, click Checker Findings.
The Checker Findings subpage appears.
(Optional) On the Incident Details page, to view the user actions that are available to you for the incident, click Additional Diagnostics. Each user action provides a way for you to gather additional diagnostics for the incident or its problem.